Closed Captions & Subtitles in QuickTime Pro

You’ll learn:
- How to create and upload a closed caption or subtitle file compatible with QuickTime
- How to adjust the position of captions to display at top or bottom of the screen
- How to customize format and styling of caption text and background
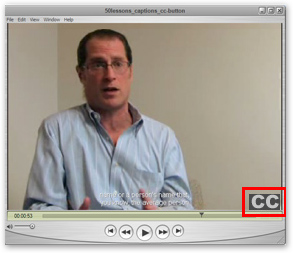
- How to add a CC toggle button to QuickTime videos
- How to display CC on QuickTime Player
Note: these instructions work for QuickTime Pro software. It is not possible to add captions to videos in the free version, QuickTime Player.
To learn how to add closed captions or subtitles to videos in QuickTime Pro, download our free How-To Guide

How to Add Closed Captions & Subtitles in QuickTime Pro
QuickTime accepts closed caption files in a text file with specific formatting. This custom format is called QT. Below is an example of a QT caption file:
![[00:00:03.090] DAVID BERMAN: Now even if the captions are there, though, [00:00:05.009] it's another matter to make sure the captions are[00:00:07.050] all high quality, and that requires a human eye--[00:00:11.900] or you smartly order all your captioning from 3Play.](https://www.3playmedia.com/wp-content/uploads/quicktime-caption-sample.jpg)
You can download a correctly formatted QT caption file from 3Play Media.
Step 1: Submit Your Video File for Transcription & Captioning
Log into your 3Play Media account.
From the Upload tab at the top of the screen, select From Computer.
Choose your video and follow the onscreen prompts to specify turnaround. You’ll receive an email when your captions are ready.
For additional details, read the support article on uploading videos for captioning.

Step 2: Download Your Closed Caption File in QT Format
In your 3Play Media account, navigate to My Files and select the video file you uploaded for captioning.
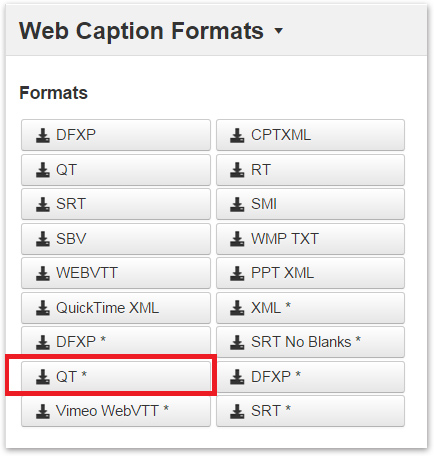
Click Download, and under the Web Captions section, select QT. A QT (.txt) file with the name of your video will download to your computer instantly.
Step 3: Add Closed Captions in QuickTime Pro
Open the video file in QuickTime Pro.
Then open your downloaded QT file in QuickTime Pro. To do this, locate the file on your computer. Right-click the file and select Open with > QuickTime Pro. This will open a separate QuickTime window that shows just your captions without the video.
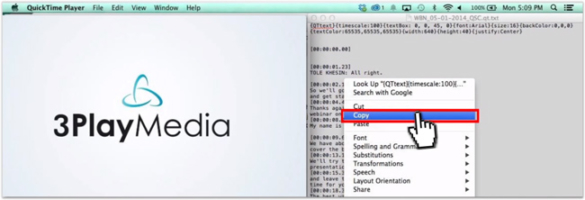
Copy the captions to the clipboard by clicking Edit > Select All and then Edit > Copy.
Click on the QuickTime window of your video. Make sure that the play head is at the beginning. This ensures your captions will sync properly.
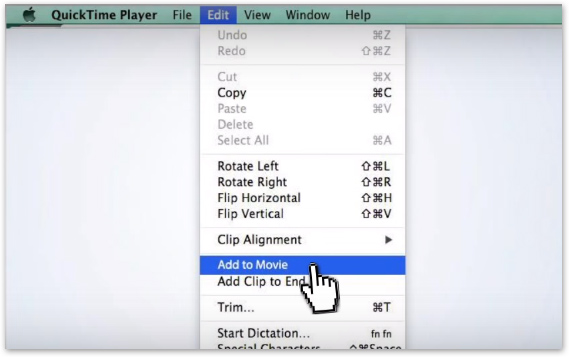
Add the captions by clicking Edit > Add to Movie.
Save your video file.
You’ve got captions!
How to Adjust the Position and Style of the Closed Captions
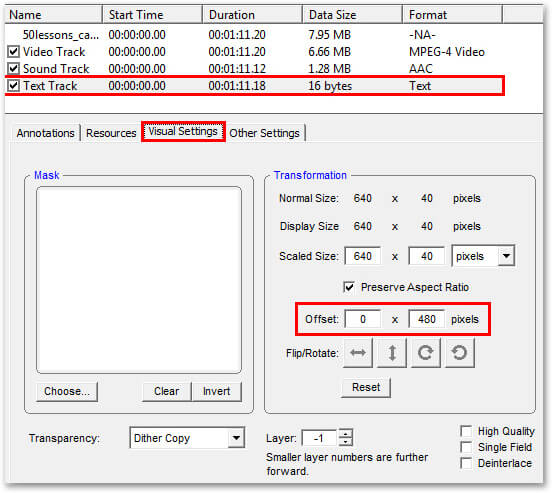
The default position of the captions is above the video. To move the captions to the bottom of the screen, navigate to Window > Show Move Properties.
In the Movie Properties window that launches, click on Text Track > Visual Settings.
To position the captions underneath the video, you’ll need to make the vertical offset equal to the height of your video.
You’ll need to know the pixel dimensions of your video. You can get this information by viewing Video Track > Visual Settings.
For example, if your video pixel dimensions are 640×480, you should change the offset to be 0 x 480.
Close the Movie Properties window.
Go to File > Save As and select Save as a self-contained movie to save your video with the adjusted caption display.
How to Customize Caption Display
Open the QT caption file that you downloaded from 3Play Media using a text editing program like Notepad or Word. Here you can make edits to the caption display style.
Adjust style settings by adding the text descriptors shown in the table below. Simply copy and paste the text descriptor into the top of your caption file.
For more style options, see the complete list of QuickTime text descriptors.
When you’re satisfied, save the caption file and add it to the video as in step 3 above.
| QuickTime Pro Text Descriptor | Description |
| {keyedText: on} | Displays closed captions or subtitles with a transparent background. |
| {dropShadow: on } | Creates a drop shadow for the text. |
| {dropShadowOffset: 1, 1} | Offsets the drop shadow 1 pixel to the right and 1 pixel down. {dropShadow:on} must be specified. |
| {dropShadowTransparency: 127} | Specifies the transparency of the drop shadow. Value must be between 0 and 255. |
| {anti-alias: on} | Display anti-aliased text. |
| {font: Arial} | Specifies the name of the font. |
| {fontstyle: plain} | Specifies the text style. Options are: plain, bold, italic, underline, outline, shadow, condense (decreased spacing between characters), extend (increased spacing between characters). |
| {justify: center} | Specifies the text alignment. Options are: left, right, center, default. |
| {size: 18} | Specifies font size. |
| {textColor: R , G , B} | Sets the RGB text color. E.g. {textColor: 65535, 32000, 0} is orange. |
| {backColor: R , G , B } | Sets the RGB background color. |
| {textBox: top , left , bottom , right} | Specifies the dimensions and location of the box containing the closed captions or subtitles. For example, {textBox:0, 0, 45, 640} creates a box that is 45 pixels high by 640 pixels wide starting from the top left corner of the video window. |
How to Add a CC Toggle Button to the QuickTime player
The file that you need to save is called toggle_caption.mov.
Open the toggle_caption.mov file in QuickTime Pro. This will open a separate QuickTime window that shows the CC button.
Click Edit > Select All and then Edit > Copy.
Return to the QuickTime window with your video and make sure that the play head is at the beginning.
Click Edit > Add to Selection and Scale.
Navigate to Window > Show Movie Properties and rename the text track to “caption”. To do this, select the text track and then click once on the text itself.
Select toggle_caption > Visual Settings and position the CC button by adjusting the horizontal and vertical offset.
Close the Movie Properties window.
Save your video by clicking File > Save As > Save as a self-contained movie.
QuickTime Player Settings
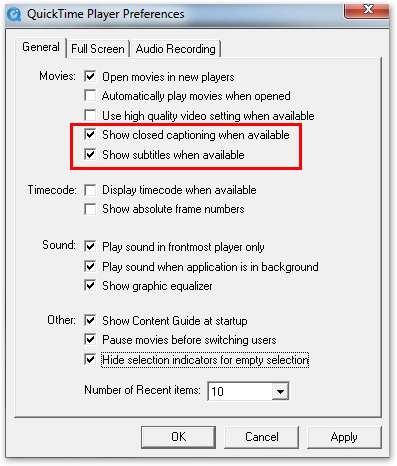
You need to change the QuickTime Player settings in order to view closed captions or subtitles.
Navigate to Edit > Preference > Play Preferences and check the boxes “Show closed captioning when available” and “Show subtitles when available”.
To learn how to add closed captions or subtitles to videos in QuickTime Pro, download our free How-To Guide


