Captions & Subtitles in MS PowerPoint

Adding Captions & Subtitles in PowerPoint 2013 & Office 365 with Office Mix
PowerPoint recently released a free add-on called Office Mix that is compatible with MS Office 2013 and Office 365. Office Mix lets you create engaging presentations using screen capture, audio recordings, onscreen notes, embedded live websites, and more. To download a free tutorial on adding captions and subtitles to PowerPoint presentations, click the image below.Step 1 - Install Office Mix
Click on Get Office Mix on the Office Mix website to download the installer. Open the installer, and in moments PowerPoint will launch with Office Mix installed. You'll see a new MIX ribbon along the top. You can use the Slide Recording feature on the new Mix panel to record narration over your slides and also record animations and interactions with your content. This audio-visual recording, timed with your slides, will become a "Mix" that will be captioned.
Note: in order to eventually export your presentation as a Mix, make sure you save your PowerPoint file in .pptx format.
Step 2 - Download Your Presentation as MP4 File for Transcription
To prepare your presentation for transcription, you'll need to save your file as an .mp4, not .ppt. Go to MIX > Export to Video and then select your video resolution based on the playback device. For the purposes of video transcription, you don't need to select a high resolution. Name and save your .mp4 file.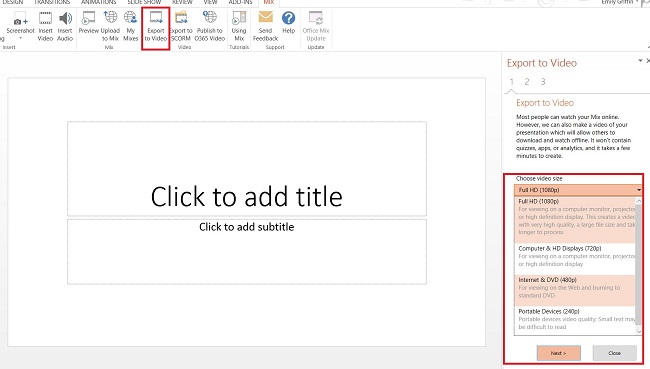
Step 3 – Submit Your Recording for Transcription & Captioning
Log into your 3Play Media account. From the upload menu, select Direct Upload. Select your .mp4 file. Follow the onscreen prompts to specify turnaround. You'll receive an email notification when your captions are ready.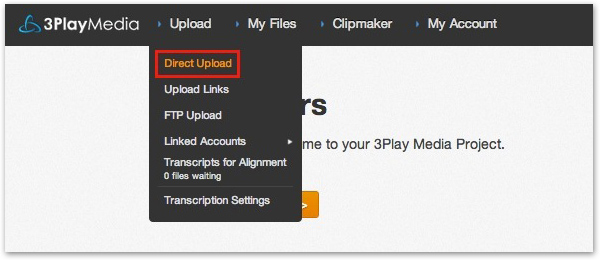 For additional details, read the support article on uploading videos for captioning.
Step 4 – Download Your Captions in DFXP Format
Go to the My Files page in your 3Play Media account and select your recording. Click on Request Download and select the DFXP format. Save the closed caption file to your computer.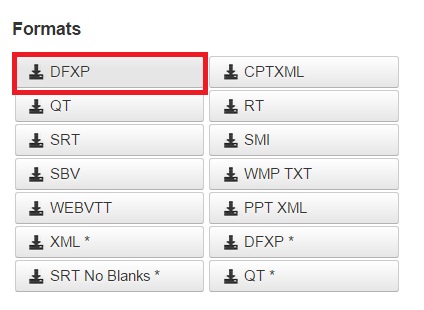
Step 5 - Convert DFXP to TTML Format
Office Mix only accepts caption files in TTML (.ttml) format. TTML is an XML file type, as is DFXP. If you change your DFXP caption file to TTML, then Office Mix will accept it and be able to read it. Open your DFXP caption file in a simple word processor like Notepad. Go to File > Save As. Add ".ttml" to the end of the file name. Under Save File Type As, select All Files.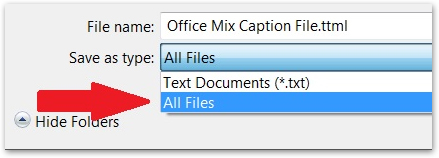 Under Encoding, select UTF-8. Hit Save, and your captions will be saved as a TTML file.

Step 6 - Upload TTML Caption File to Your Mix
Open your PowerPoint document and click on Upload to Mix. In the Upload to Mix panel, click next. Login securely with your Microsoft, Google, or Facebook login credentials to access your files on the cloud. In the next pane, select "This is a New Mix" and make sure to check the box to Enable playback on mobile devices. This exports a video that can be viewed on mobile and offline. If you don't check this box, the closed captioning feature will not function.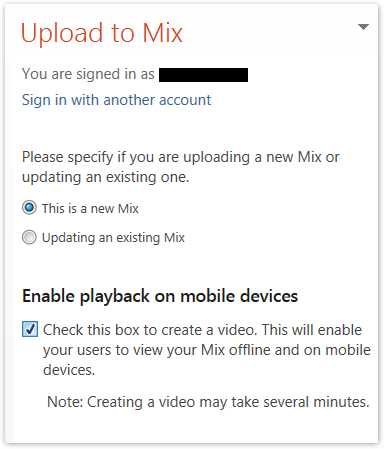 Click Next. When the mix has uploaded, click Show Me My Mix.
Fill out the fields for title, category, description, etc., for your presentation. In the Closed Captioning section, click on Upload TTML File. Select your TTML caption file from your computer and upload it.
 For additional details, visit Office Mix's PowerPoint captioning support page.
Adding Captions & Subtitles in PowerPoint 2010 with STAMP
If you use PowerPoint 2010 or later, you have the option of using STAMP. PowerPoint has an add-on (called STAMP – Subtitling text add-in for Microsoft PowerPoint) that allows you to add closed captions to the video and audio files in your presentation. Here are step by step instructions on how to use STAMP to add video captions to PowerPoint. Note: At the moment, STAMP is only available for Windows users.Step 1 – Download and Install STAMP
First, confirm which version of Microsoft Office you have, and check whether it is 32-bit or 64-bit (note: the default is 32-bit). To do this, open PowerPoint and navigate to File > Help > About Microsoft PowerPoint. Make sure you have PowerPoint 2010 or later. Go to Subtitling Text Add-in for Microsoft PowerPoint (STAMP) and download the correct version for your computer (32-bit or 64-bit). Save the .zip file to your computer and extract the files. Run STAMP Setup (32-bit or 64-bit).msi and follow the steps for installation. When this is done, open PowerPoint and navigate to File > Options > Add-ins. Verify that STAMP is listed under Active Application Add-ins.
Step 2 – Submit Your Recording for Transcription & Captioning
Log into your 3Play Media account. From the upload menu, select Direct Upload. Follow the onscreen prompts to specify turnaround. You'll receive an email notification when your captions are ready. For additional details, read the support article on uploading videos for captioning.
[su_button url="https://go.3playmedia.com/ht-powerpoint" target="blank" style="3d" background="#DEEFF5" color="#000000" size="10" center="yes" radius="10" text_shadow="0px 0px 0px #000000"]Add Captions to PowerPoint Presentations[/su_button]
Step 3 – Download Your Captions in PPT XML Format
Go to the My Files page in your 3Play Media account and select your recording. Click on Request Download and select the PPT XML format. Save the ppt.xml file to your computer.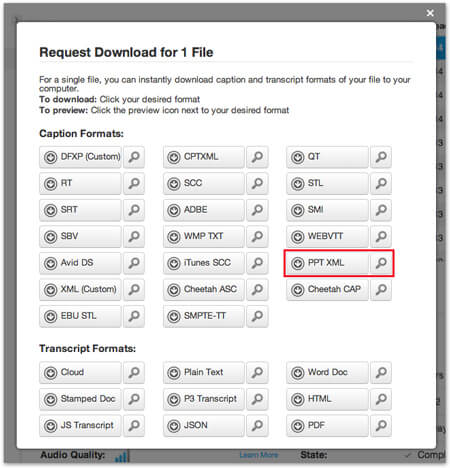
Step 4 – Import Your Captions to Microsoft PowerPoint
From the Insert tab in PowerPoint, click the Video menu and select the video you want to add to your presentation. In Video Tools, click the Playback tab, then Add Captions. Click Captions from File.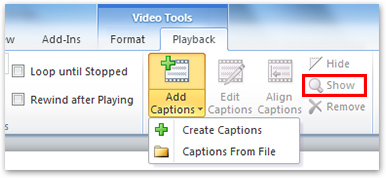 Select your PPT XML file and click Open. Once your captions have imported, you can edit or realign the captions from the Playback tab. Select Show to show captions.
 Play the video from the beginning to see your results, and remember to save your presentation before closing.
Video Caption Compatibility in PowerPoint 2016
If you embed a captioned video into a PowerPoint 2016 presentation, captions will function correctly depending on the device and caption format. The table below shows which caption forms will work on embedded videos if played back on an iOS device.| Caption File Format | PowerPoint for iOS |
|---|---|
| CEA 608 | Yes |
| CEA 708 | Yes |
| WebVTT | No |
| TTML | No |
| SRT | No |
| ASS/SSA | No |


